How to create a site plan with your own hands
The basics of creating a site plan with your own hands

Whoever said anything, and a beautiful garden is a garden according to plan, without it there is no way. However, the services of a landscape designer are expensive, and not always he will be able to feel your personality, offering though a beautiful, but not "your" garden. Maybe you should try to plan a holiday plot yourself? Believe me, you will not be worse than professionals! And for this you do not need knowledge of special computer programs or special ability to draw. Create a plan for your garden will help you modular grid - the main "secret" tool of landscape designers.
Plan a site on a modular grid with your own hands
 Step 1. Draw a general configuration of your summer residence. More precisely, do not draw, but copy the documents to your site using the scale 1: 100. You only need the configuration, the boundaries of the plot and the outline of the house.
Step 2. Determine the size of your modular grid. That's it - determine. To do this, look at your holiday home: does it have any major architectural features that are repeated at least once? I give a clue: if your 10m is a simple form, then such windows can be your home's windows. Then take the size of the largest window - this will be the basis of the modular grid (cell size) of your plan.
Step 3. On the tracing paper draw a grid, the cells of which will be equal to the size of the window on the scale of 1: 100.
Step 4. Narrow down your desires: think about what you would like to see in your own garden. I advise you to cut out pictures of plants, garden objects, buildings that you liked, and paste them in the form of a collage (see photo), so that all the "objects of desire" were before your eyes. In this case, the collage will not be abstract, but extremely plausible, because all the cuttings need to be glued not just on a piece of paper, but on the configuration of your site.
Reference by topic: How to make a beautiful garden - planning and setting up a garden with your own hands
First put the clippings on the image of the site, arbitrarily move them through the base, until you get a composition that you like.
I advise first to take pictures of priority objects, those that you would like to have on the site at all costs, and then in turn add secondary objects. In the process of working, some images may not be combined with the rest - they will have to be abandoned. Or the composition itself "asks" for additional images that you do not have.
They need to be searched again in magazines or advertising brochures. As a result, you will have a beautiful collage, which will be the embodiment of the garden that you really like, the garden of your dreams. The most successful variant of a collage paste on the image of a site. In a real garden, all these objects, most likely, will be in the same places as on the collage.
Step 5. Outline the approximate location of the objects that you want to see in your garden, on the schematic outline of your site (taking into account light or shadow, features of the relief). These can be arbitrary-shaped areas that will correspond to certain zones of the future garden (where you roughly want to arrange an arbor, where - barbecue, etc.).
Step 6. Modular grid on the tracing paper superimpose on the plan of your site (with the marked zones). Move it a little so that whole cells are placed at the entrance to the house (this is done for convenience, the entrance to the house is considered a parade zone, it needs to be decorated most beautifully, and it will be inconvenient for you to move around the displaced cells). Secure the sheets with paper clips. Everything is ready to draw a plan.
Step 7. Outline the future objects of the garden by cells.
In this case, the location of the object that you choose should correspond to the distance, the multiple size of the cell.
For example: you want to put an arbor near your home.
Outline this place is not where you have to, but go away from home on 2,3,4, 5, etc. cells, using an integer, without fractions.

In this case, the size of the gazebo (projection on the plan) must also be a multiple of the whole cells. Then the gazebo on your site will look harmonious and beautiful.
See also: Planning a plot - a mini park instead of a garden
Important: the outline of the garden objects on the cells gives a general idea of them. At the same time, a clear geometry is not at all necessary. If you want to get landscape, natural forms - round the lines simply by hand.
Step 8. Connect the circled objects between the tracks. Tracks also circle on the lines of cells or on their diagonals, depending on the particular picture. If necessary, round off the corners. The plan is ready.
© Author: O. Voronova

PLANNING THE DESIGN OF THE PLOT
You can create a dream garden with the help of a landscape design project. But it is not always possible to use the services of specialists. No problem! We encourage you to prepare your own plan for future changes. Take note of the advice and recommendations of the head of the private nursery "Hydrangea Factory" from Minsk, Natalia MOROZOVA.
SITE PLAN WITH YOUR HANDS STEP-BY-STEP
- Draw a site plan on squared paper. Choose a scale (for example, 1 cell = 1 sq.m). Mark the cardinal directions.
- Divide the space into functional zones: residential (house, summer kitchen), front (at the entrance), utility (barn, garage), a place for a garden and a vegetable garden, a corner for relaxation - taking into account your needs (gazebo, children's or sports ground, pond ).
- Write a list of required items.
- Select the main places and plan the location of all other elements from them.
- Do not forget to put on the plan everything that is already on the site (trees, buildings that you want to leave). Also mark large objects outside your territory.
- Plan the location of the zones and the paths connecting them. Mark the direction of the paths with arrows. To make the landscape more natural, avoid straight lines and corners.
- Consider communications (septic tank, well, drainage ditches, electrical wiring) and garden lighting - if necessary.
FEATURES
The front is the place that is seen first when entering the site, so this zone should be the most attractive. Usually this is a small area - up to 6% of the total area.
The economic zone is more often located on the northern or northwestern side of the site. It may include a barn, a woodshed, a workshop, an outdoor shower, a toilet, a bathhouse and be located next to the garden. The hozblok is separated with decorative lattices and decorated with lianas.
The garden and garden are placed away from the recreation area. Allocate an open area illuminated by the sun, taking into account the direction of the winds. Often fruit trees are grouped in one place, shrubs in another, and zoning vegetables in a third. For large trees, the north side is suitable. They should cover the beds from the wind, but not shade them.
In the recreation area they build a patio, a gazebo, put a barbecue. Beautiful views of the site should be visible from here. Depending on the number of people in the family and their needs, there may be several such zones. For convenience, they are connected to the house by paths and, if possible, placed further from the entrance to the site.
The playground must be safe for children. Choose a soft surface - sand, lawn. The main thing when placing it is that the zone is clearly visible from the house. Take care of her shading.
INSOLATION PLAN
The insolation plan (information about the shaded and illuminated places on the site) will help in the selection of plants and in choosing the location of future buildings, taking into account the need for illumination of each zone.
After you have drawn the boundaries of the territory on paper and marked all existing and future objects in relation to each side of the world, determine the main sources of shading (house fence, buildings, trees - your own and neighbors) and apply shadows from them as follows:
- in different colors, usually at 9, 12 and 19 hours;
- in the morning the shadow lies about two heights to the west of the object (that is, if the fence is 2 m, then the shadow from it is 4 m); in the afternoon - one height to the north; in the evening - two heights to the east.
IN THE GARDEN EVERYTHING HAS THE PLACE
If you want to have a maximum of sunny zones on the site, then the house is best located in its northern part. In addition, this way it will warm up as much as possible through the windows with low sun in winter, spring and autumn.
The household part, parking for the car and the cellar should be placed in the shade or partial shade.
Select a lighted area for a garden and vegetable garden.
To shade the playground, use its equipment - a playhouse or a climbing complex. Place them on the south side.
It is also desirable for the lawn to choose a more sunny location. In the light, cereals develop better, and mosses and mushrooms - worse.
VISUALIZATION AND PLANNING OF THE PLOT AND BUILDINGS

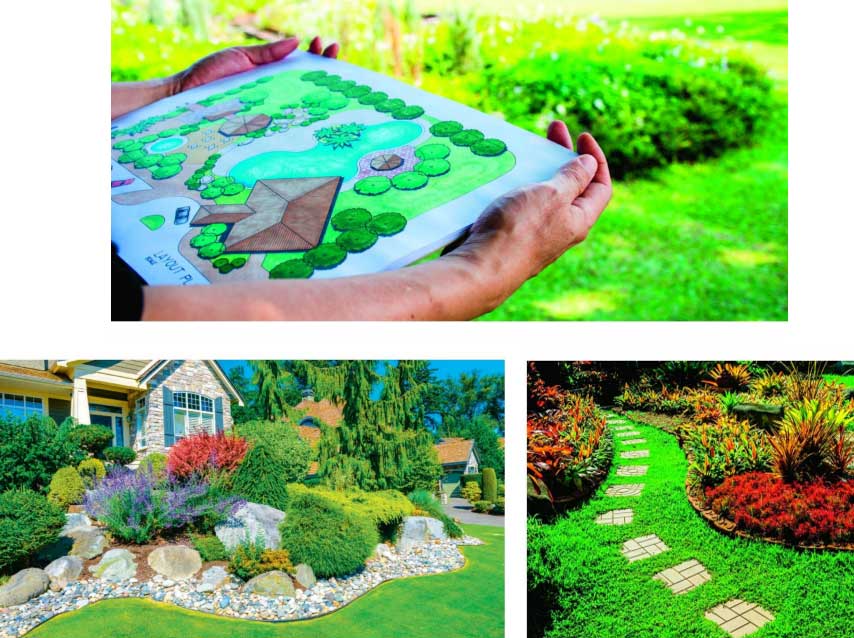
It is customary to make wishes on New Year and Christmas. But in order for them to be fulfilled, you need to clearly understand what you want. Likewise in the garden. You can’t just dream that everything was beautiful. It is necessary to present the picture that you want to see on your site. Better yet, visualize it. And the more accurately you do it, the faster the materialization of desires will occur.
In fact, everything is very simple. On the Internet or in magazines, choose the pictures of the garden that you like the most, print or cut them out and place them on a magnetic board or on a sheet of drawing paper. You can even just make a collage on your phone. The main thing is to put them together and check how they fit together in style, color, materials used and whether they match the overall idea. It is advisable to take a photo of your house or elements of its decoration and buildings on the site in order to more accurately select plants and small architectural forms (SAF). When all the photos are put together, it immediately becomes clear which elements are superfluous and what needs to be added to achieve overall harmony.
But this is only the first step. Now you need to check your dream with reality, because not all desires can be realized in a particular area. To do this, each idea should be carefully analyzed. For example, you want a large swimming pool or body of water. Will there be enough space for him on the site? Are you ready to spend time and money on its arrangement, maintenance, water purification, conservation for the winter? Maybe in good weather it is better to relax on the river or lake, and in bad weather go to the pool or the sea? And you can plunge into hot weather in your area in a small font.
Or you dream of a large gazebo with a summer kitchen and a dining table. Analyze how often you are going to have lunch or dinner outside, whether it is convenient to carry food there, whether there will be water and electricity nearby. And is it worth building another monumental structure, or is it easier to organize a patio area next to the house, where all communications are nearby and there is even wi-fi.
The same goes for gardens and fruit trees.
Estimate: how many greens, vegetables, berries, apples and pears are really necessary for your family. For example, I removed pears from the garden and planted more blueberry bushes of different ripening periods. Large fruit trees, especially resistant to rust, require constant processing, pruning, take up a lot of space, provide shade, their fruits are often damaged by diseases and pests. A garden also requires a lot of effort and time, and there are many ways to make it low-maintenance and rational. Select for him the sunniest place on the site, think over how watering will be carried out, try to make raised beds, and fill the aisles with gravel or lay out a hard surface. Use the principles of natural farming: use mixed plantings of vegetables and flowers to repel pests and reduce the number of diseases, sow green manure to improve soil fertility, mulch plantings and plan crop rotation correctly.

It is also desirable to think over the economic zones where the inventory will be stored, and the convenient placement of the compost pit. And also - watering and paths on the site. Ways of movement between functional areas must be made as convenient as possible. After all, you can dream of a winding path winding around the site, but in winter it will need to be cleaned of snow. And, you see, the shortest path from the bathhouse to the woodshed or from the house to the outbuildings is a direct one. But walking paths, which will be used only in summer, can be made of gravel, bark or sown with a lawn, and their shape can be of any configuration.
I have two main straight paths in my garden: from the gate to the porch of the house and from the patio to the garden area. The rest of the travel paths are sown with lawn, and they are already winding in smooth lines through the garden.
Also think about what you like to do most in the garden. Maybe you need a cozy nook hidden from prying eyes for reading or relaxation? Or maybe you like to relax in a big company and you need a lot of space for dancing and active games? What do the rest of the family want to do in the garden? Only by checking all the desires, you can make a comfortable garden for the whole family.
Next step. Drawing a plan! After all, it is best to check your desires on paper. You can take the cadastral plan of the site with buildings, enlarge it and apply the existing trees, shrubs, beds and small architectural forms in real proportions. And only then try to place all your “Wishlist” there.

Of course, if you are not an experienced landscape designer, it will be difficult to immediately draw a plan for landscaping your site. But to distribute functional zones on paper in proportions, allocate places for flower beds and mixborders, draw beds and mark fruit trees for everyone. To make it easier, you can make a basic sketch with the house, buildings and existing trees that you want to leave, and draw options for placing the remaining zones and plants on tracing paper, applying it on top of the plan. You can even take photos of the zones you want to transform, print them out, and, using tracing paper on top, draw future modifications. Nai-
more advanced users can use computer programs. The main thing is to make at least a rough plan, which may have to be changed later, but the general concept will still be clear. My first plan was very far from ideal, and now everything is completely different in my garden. But what I like about it is that individual seats were marked with beautiful lines on the lawn. I didn’t know yet what I would plant there, but the picture of the garden was already taking shape. Lawn separately, seats - separately.

Having decided on the placement of zones and the desired elements, we think over the details: what materials will be used for buildings and small architectural forms, what are you planning to make paths from, what plants are you going to plant around, what colors will dominate, what decor is appropriate for your style. Here you can also use collages and clippings.
There will be many options, and there is also a lot of work to implement these plans. But everything starts with desire. And if it is, then all dreams will come true!
© Author: Tatyana Mager, landscape designer Photo by the author
PLOT LAYOUT - VIDEO

Below other entries on the topic "Dacha and garden - with their own hands"
- How to decorate a country house and garden for the New Year - New Year's lighting of the site and other techniques
- Supports and skeletons for vertical landscaping and flower gardens with their own hands
- Topiary figures with their own hands in the country without a haircut
- Arrangement and design of the site - garden as an apartment
- Kvamoklit, Maurandia and foreign nasturtium - the three best vines for vertical gardening
- An example of registration of a mixborder with rhododendrons - a scheme of planting flowers
- Beautiful garden on 6 acres with their own hands - design and plants from A to Z
- Growing coniferous in the open ground in the country - frequently asked questions
- Wooden wheels in garden design - use cases in the photo
- The flower garden is beautiful all year round
Subscribe to updates in our groups and share.
Let's be friends!
#
I'm going to buy a plot of land for construction.
Tell me, what documents should show the seller - the owner of the land?
#
First of all, it is necessary to have title documents for the land plot, that is, confirmation that the seller really owns the land. The documents should indicate the purpose of the land plot - for individual construction. An indispensable condition of the future transaction is the availability of cadastral number of this site. Having received these documents, it is necessary to verify compliance with them in the public register of real property rights.
If this land is in the register - you can make a deal. If there is no register in the register of the given land, or there is something wrong with the site, or because of objective reasons, this site has not yet been entered in the register of property rights, and it is necessary to bring land to the state register before the transaction.
#
Thanks, it’s useful - I never thought it’s so difficult to draw a plan of the plot ..